Showing posts with label kitchen. Show all posts

Tuesday, November 27, 2018

Gold is the New Black

Gold is making a comeback! Gold, brass, champagne, antique gold, satin brass, etc. All of them are super popular right now. I think one of the reasons why it's so popular is that it creates a warm, sophisticated and cozy vibe. Gold also goes well with white, black, and gray which is what a lot of kitchens are made of these days. Wood tones with gold accents are just gorgeous and create that cozy feeling.

I follow a lot of home decor bloggers on Instagram and some of them just have the most beautiful kitchens that have gold knobs and pulls. Here are some of my favorites:


Source: 1111LightLane

Source: SummerAdams

Source: ThePinkDream


Don't be afraid to mix metals. It has taken me a long time to realize that I could do that. A gold ceiling light with black door knobs is perfectly fine and will look amazing. Stainless steel appliances can even mix with gold accents in the kitchen. Try to pick a main metal for your home and have 1-2 accent metals scattered throughout. Look for inspiration pictures that you love and see how they interchange different metals throughout the room.

Amy from CrazyChicDesign did a great job of mixing metals in her living room. A gold curtain rod, a black candlestick, black knobs on the side bar, a silver coffee table, and metallic lamp bases. But it all looks put together and seamless.


Chris and Julia recently renovated their master bathroom and it's just gorgeous. They did an awesome job with mixing metals. Gold and black sconces with satin nickel faucets and a satin nickel towel holder. 


This kitchen is stunning with the gold pendants, gold handles and black faucets. The wood shelves and wood stools help add in warmth.


Gold, brass, and copper have warm tones. Where silver, stainless steel, and chrome have cooler tones. You may have a very neutral palate in your living room and want to give it a pop of color while still adding warmth. Gold will help create that cozy effect.

I'll be honest, at first I wasn't sure about all the gold. It has really taken me a year to really love it. I have one end table and one floor lamp that are gold and love them. But to have gold as a permanent fixture (ceiling lights and knobs) made me a bit nervous. However, after countless hours looking at beautiful homes on Instagram, the gold has grown on me. So much so that I'm using it as my main metal in our new home! 

My next post will be all about the new lights I ordered and I can't wait to share them with you. Stay tuned!


Thursday, March 19, 2015

Part 2: Faux Marble Countertop

If you remember in this post, my husband and I switched out a desk area in our kitchen for a coffee bar station. I'm calling it this because I really have no clue what it's supposed to be called and right now it holds my Keurig and all my coffee supplies. Plus I've always wanted a coffee bar!

So we left with this lovely mismatched area that needed a countertop.


My husband cut a piece of quarter inch pine plywood down to fit the space. I keep telling myself that maybe I'll learn how to use all of his fancy tools but in reality, they scare me! Maybe one day...

I bought some marble contact paper. The first roll I bought was off of Amazon and it was awful. The backing didn't want to come off and it was just a mess. So I was super excited when I found this stuff at Lowe's.


This is what I want our future countertops to actually look like. I love white and gray swirl marble. Beautiful!

My model will demonstrate how to stand on the future countertop:


This was really easy.  I just rolled out the paper and cut where I needed. The contact paper wasn't wide enough to cover all of the board so I did have to do it in 2 sections. I made sure the seem was in the back and you can hardly tell unless you're trying to look for it.

I used duct tape on the back just to make sure it was super secure. To get the corners just right, cut a little slot and fold it over.


And here she is! All ready to go.


I put my Keurig on there along with a cute stand for a catch-all space that holds daily used things. That big black bog looking thing is our stereo that we mounted to the wall. And of course I had to add some flowers and candles for some prettiness. My next project for this area is to paint the cabinets but I'm waiting for some warmer weather!


Tuesday, March 17, 2015

Part 1: Creating a Coffee Bar

When we moved into our home I was so excited about this space. It is on the opposite wall of the kitchen sink.


Although I was not super excited about that desk. I wanted more storage and I really didn't want a desk in the kitchen.


Another problem is that they make refrigerators bigger now and ours would definitely not fit into that small space. So we came up with a plan to make this area work.

Always measure your space before hand and then head to everyone's favorite store... Lowe's! We picked up some project cabinets. These are cheaper cabinets but if you get these wood ones you can paint them any color you want.


These are a temporary fix. When we finally get around to redoing our whole kitchen, these will be replaced as well. But for now they hold up well and I get my extra storage!

We started by taking out all of the lower cabinets and 1 of the uppers.


They didn't put flooring in that one spot so we had to do something to make it even. We just used some leftover carpet tiles we had from finishing up our basement.


We put them in and took some more measurements to figure out where the screws would go.

As you can see, the cabinet doors do not match. I have a few options with this. I plan on painting all of the cabinets in the kitchen white, including these. This will help these blend together more and not be so noticeably different. Another option would be to take off the doors on the top and have more of an open cabinet/shelving look. The third option would be to replace these two upper cabinets with project cabinets as well. Which is probably what we'll end up doing since the kitchen renovation is still a few years away. However, I will wait until everything is painted and see how it looks.


On Thursday I'll share how I created a faux marble countertop!

Monday, March 2, 2015

Super Easy Drawer Liners

I've got a quick project for you today that is super easy and will only take you minutes to complete.

Every time I opened my silverware drawer, it looked like this:


Because who doesn't like to stick their hand way in the drawer to fish out silverware when you're in a hurry to feed 2 hungry kids?!
 
I had a roll of drawer liner sitting around from literally 5 years ago that I just never got around to putting in. So I decided to make good use of it. I got this particular one from Bed Bath & Beyond but I know a lot of stores carry it. It has little bumps on it that help keep your utensils from sliding all over.
 
I first rolled it out into my drawer and figured out where I would need to cut it.


I used a combination of a knife and scissors to get the job done. Yes, that is a mix of nail polish and paint on my fingers! I am always painting something!


I was able to cover 8 drawers with the roll I had. I took this time to reorganize things, like my small containers. Although within a day or two they were already out of order thanks to some small people who like to play in there.


It's a super easy, inexpensive project that will make your drawers look pretty and also give you some sanity when getting out your forks and spoons!


Tuesday, February 24, 2015

The Kitchen: After

Welcome back! Hopefully you read yesterday's post and saw the before pictures of the kitchen in my last house. Today I'm excited to reveal the after pictures so let's get right into it.

The first thing we did with this kitchen was pick out the flooring. Mistake #1... I should have gotten samples of flooring, cabinets and backsplash and see how they worked together instead of making individual decisions. In the end it does all flow nicely but I now know to look at all my choices in one sitting and dwell on them for a month week.

I knew I wanted a very soft vinyl floor. Easy to clean up with kids, fairly inexpensive, and feels good on the feet. If hardwood were an option, I would have been all over it. Literally, I would have laid all over it!

One problem with my tile sample I got from the store was that it was not big enough for me to see all the colors and patterns I would be getting. However, I did not know that at the time. So when my husband sent me a picture of what the floors looked like installed my instant thought was, "why is there orange in there?!!!" I thought maybe there was something wrong with his camera! Nope.


These floors did hold up nicely with the kids and were a lot softer than I thought they would be which I loved. They were also easy to mop so bonus points for that. Another bonus point is that the vinyl actually stays pretty warm in the cold Michigan weather so keep that in mind if you're considering this.

The cabinets came next. With our time crunch and my inexperienced decorating skills, I literally looked at 3 pictures of kitchens before this process and knew I liked the white look. However, in those pictures the cabinets looked off-white so that's what we went with. We chose Kraftmaid cabinets in the color Canvas. Excellent soft closing cabinets and looked great.

Note to self: I love white cabinets. I will never again get off white cabinets because it doesn't go with my love of all things white and gray.


Mistake #586, we picked Thermafoil cabinets because they were cheaper. Within a year of having these cabinets, they were already peeling off at the bases because of this cheaper option. Lesson learned to save up that money and get the more expensive cabinets because you will use those babies every single day.

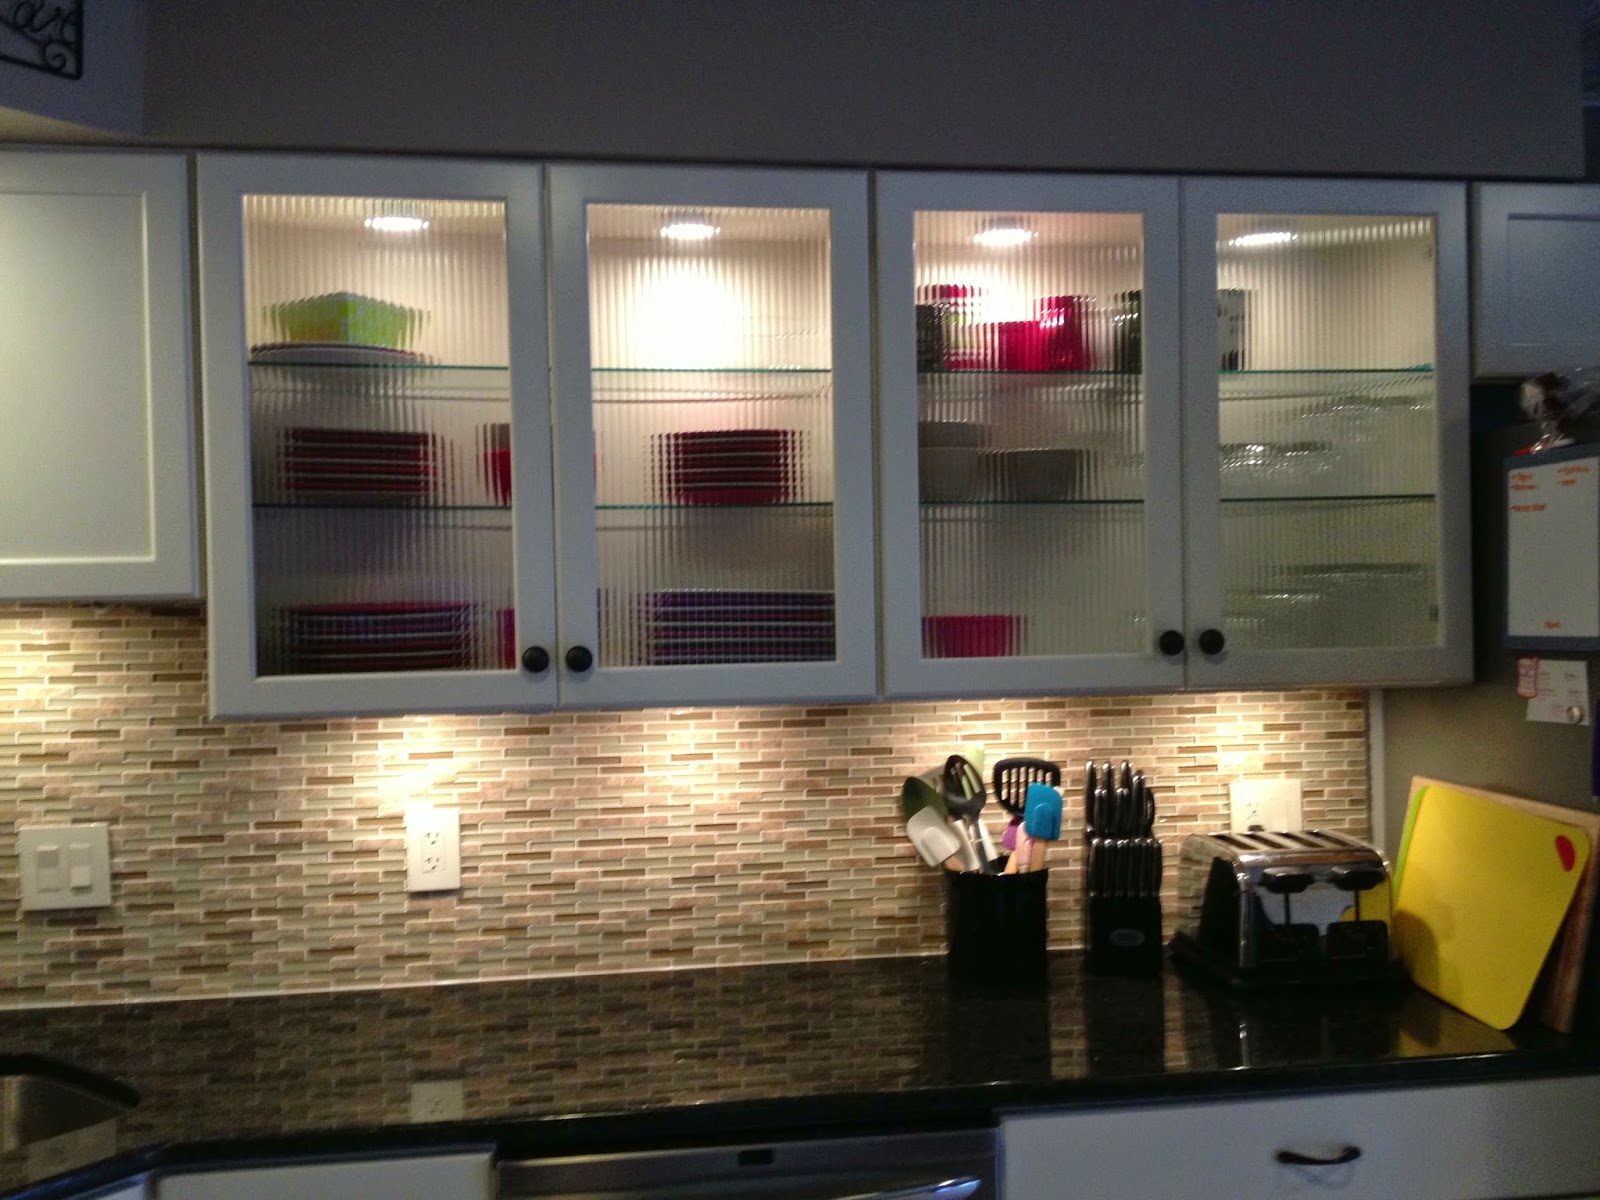
I knew I wanted some of the cabinets to have glass doors. I thought this particular pattern would be interesting and different from the norm that most people do. It had slight ridges in it which was good so it wasn't completely see through. You guessed it, they bothered me a few months later when I really learned what my style was. However, they looked great in the kitchen and functioned well.


I loved the look of black countertops against the white cabinets so we chose a dark granite from Lowe's. I would highly recommend upgrading your countertops from laminate to granite. The granite was my favorite part of the whole kitchen.

The backsplash was next. One day the tile guy showed up and I knew what I wanted in my head (which was more of a stone look) and he changed my mind. He said he brought some other samples of what was more in style now and my husband and I made a split second decision to go that route. Good decision? Yes.


We picked this color combo because it matched the floor. In the end I am happy we had them match. This room was all about the tan and brown. Which would soon begin to bug me because of my love for all things gray.

Meet our pretend island. This kitchen was definitely a good size but not quite big enough for a real island. A few months later I actually put a counter height small table in the middle of the room with two chairs so that the kids could eat in here while I was doing dishes or other random things you do in the kitchen.


There she is, the big kitchen reveal! I learned so much with this renovation but it really wasn't until after I had lived with it for a few months. I figured out my style, what I like and don't like, and what works best for our family. All of which really helped us in choosing our current home and will help with future renovations.


Monday, February 23, 2015

The Kitchen: Before

I had a love-hate relationship with my kitchen in my last house. We only had a month between the time we purchased the home and when we needed to get stuff ordered so the pressure was on. Like I have mentioned before, I had very little decorating experience at this point and was basically clueless. If I could go back and tell myself one thing, it would be to research. Spend hours looking at online photos or magazines of that specific room. You'll start seeing a pattern develop. Similar wall colors in your pictures, light versus dark cabinets, or lots of wood versus an all white room. You'll eventually get a feel for what you like and don't like. Then from there start planning out your room based on your favorites.

It wasn't until about 6 months after the kitchen was finished that I started realizing what I did and did not like. It was a great learning experience though and I'm glad I had the opportunity to completely renovate this room.

Let's start at the beginning. The before kitchen had red carpet, outdated cabinets, a yellow countertop and did not scream "cook in here" to me.


We live in a small town so our choices were limited with kitchen design companies. We also had limited time to make our decisions and lived 2 hours away. So we decided to work with Lowe's because we could use the one closest to us at the time and wouldn't have to drive 2 hours every time we needed to talk to them.

One of the things I realized post-renovation was that we could have changed the layout in the kitchen. It had never even crossed my mind before nor did the sales associate anyone else suggest it. It's ok, I spent the next 2 years coming up with my own changes in my head and then telling my husband what we should have done. I'm sure he appreciated me agonizing over it for that long.


If you take anything away from this post, please please please take your time with big investments like this. If you are planning a huge remodel, be patient. Really know what you want before you jump in with both feet.

My husband and cousin did the demo part to save us some money. We actually ended up reusing some of the cabinets and countertop in our basement for storage. We also took this time to do some electrical and drywall work. We added a water line for our fridge as well. So many things to think about!


Tomorrow I'll show you the after pictures and give some more tips that will maybe help your future renovations!

Friday, February 20, 2015

Finding the Spark

When we moved into our second home there were just so many things wrong with it. It was cheap a fixer upper. Two-thirds of the house was built in 1860 so it needed some work. It had low ceilings on the second level, bathrooms that should go back to where they came from, and a kitchen that needed a magical wand placed over it to bring it into the current century. 

{Sorry for the blurry pictures. This was before I had a cool phone with a cool camera}


Can you see how low these ceilings are? Right to the door frame!


Then the rest of the house was built around 1970. They added a huge living room and a gigantic master bedroom (thank you whoever you are). However, the wood paneling and orange brick fireplace did not hold a special place in my heart. And that ceiling... it taunted me every single day. This was our main living space so changing this room was a priority to make mama happy!


{We completely renovated this bathroom so keep your eyes out for the reveal soon!}

When we bought this home I had a 13 month old, was 6 months pregnant and worked 50 hours a week. I had no time for HGTV, decorating magazines, or even a precious moment to look up paint colors on the internet. I was CLUELESS. My passion for decorating was born out of two things: the desire to bring life into our 150 year old home and the mistakes I made while doing it.

Now with our third {forever home}, I have every intention of making it the home we've always dreamed of. The possibilities are endless and I have all the time in the world. With our last 2 homes we knew they weren't forever homes. They were only ours for a few years and we were always thinking about investment return and if the next home owners would like this or that. But now I can take my time adding board and batten, bead board, fixing up bathrooms, coming up with new DIY projects, and making it OURS. My passion is to make this home a place we can feel comfortable in and enjoy being in.


I will say that I am proud of where I have come with my skills but I have learned so many things along the way and I am excited to share them all with you. Come back for Monday's post where I'll share Part 1 of our Kitchen Renovation!