Showing posts with label renovation. Show all posts

Friday, November 30, 2018

All About the Lights

We close on our new home a week from today! This will be house #4 for us. We have this odd track record of never staying in a home for more than 3 years. But we are hoping this one beats the odds because moving is exhausting and expensive. Although I must admit I do love the thrill of decorating a new home and all the fun things that come with it. I even like the unpacking process (maybe I'm crazy?!).

Lighting is a key factor in any home. The color and lumens of your light bulb can completely change the feel of a room. A very white light bulb may make a room seem more sterile but also super bright. A warm light bulb will feel cozy and inviting but also won't be as bright. Think about Christmas lights. That warm glow really makes the season feel special.

Lights are one of the first things I change in a house. They can completely change the color of the paint on the walls. So before I begin painting, I make sure my lights are exactly the way I want them. Trust me, I have painted an entire first floor of my home and then changed the lights months later. It made the paint color appear completely different! So now I make the lighting a priority over painting.

If you can't afford to change out the whole light fixture, at least change out the bulbs to something you can live with. Lighting even changes my mood. Especially with the cold dreary winter months here in Indiana, I keep lights on all day long and I want to make sure they have a glow that will make me happy and not feeling depressed all day. 

The first thing to keep in mind is the number of lights the fixture has. If it's going in a small space like right next to the door or a small hallway, you may only need 1-2 light bulbs. If it's a larger space like a foyer or large kitchen area, 4-8 bulbs may be necessary.

Another thing to think about is what the fixture is made of - is there a linen drum around the light bulb? This will make the light dim and you may want more bulbs. A glass fixture will let all the light shine through and may only require one bulb to light the area. There are even lights that are completely open with no surround so the light will be extra bright. 

One last thing to keep in mine is the type of light bulb that will be used. The most common is an incandescent bulb but there are so many more. LED, fluorescent, puck lights for under kitchen cabinets, Edison bulbs are longer, chandelier light bulbs... I could go on and on. They will all give off a different glow and feel.

In my last post I talked about how gold is in style and it's going to be the main metal I'm using in my new home. And because lights are the first thing I change, I went and found gold lights that I love and will be using. 


Top left: Will be used in a small hallway
Top right: Will be used in a larger hallway
Middle: Will be used in the hallway leading to the garage/laundry area/pantry
Bottom left: Will be used in the 2 story foyer (metal bases for bulbs will be spray painted gold)
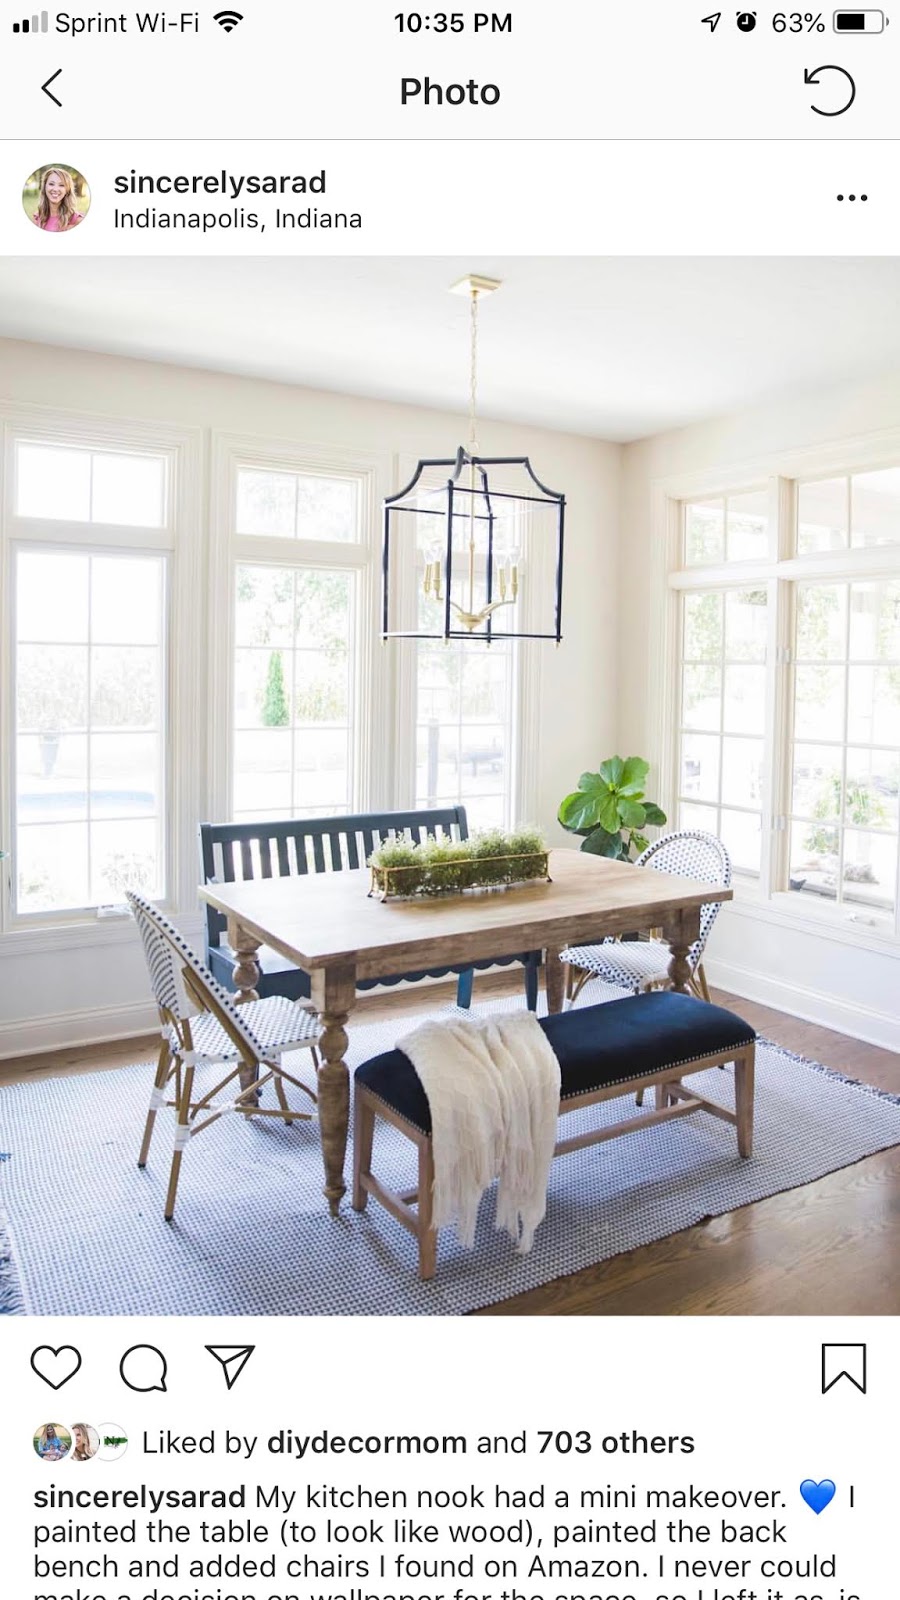
Bottom right: Will be used above dining room table

I saw the dining room light on Instagram and immediately fell in love!

I really tried to pick timeless and classic pieces that I won't get tired of in a few years. Even though these fixtures are in "style" now, I really think they'll be elegant and practical down the road. Of course you can always spray paint them haha!

I also realized I was drawn to a lot of round lights. The dining room light also has the rounded edges (can they be called an edge if rounded??). I really feel like they help soften the room. 

I saved the best for last! We will have 2 front rooms when you first walk into our new home. One will be the kids playroom and the other will have my desk, piano, and some cozy chairs in it. I wanted to replace the light in there and found the perfect one. I also found this awesome light while on Instagram (maybe I have an Instagram problem??).


It didn't take me too long to figure out it was from World Market but was only available in oil rubbed bronze. Which led me to find this picture below as well. I thought, "hey, I could spray paint it!!" However, even the oil rubbed bronze was out of stock. I was DETERMINED to get this light somehow. All of my searches came up empty.

Source: Google

Until my loyal friend Amazon showed me this:

Source: Google

I know it's not exactly the same, but pretty close! So she's on her way to my house and I'll have the lovely task of spray painting her. I'm hoping it turns out as good as I picture it in my mind.

I'll bring you along during the process of getting them installed. It is priority #1 once we get our keys!

Thursday, October 20, 2016

Long Time No.... Read??

It's been a while since we've talked! I thought I'd share an update and some exciting news! 

Back in early February I became a LuLaRoe consultant. It has blessed our family in a lot of ways. We were able to take a trip to Disney World, do some minor home renovation projects like expanding a 2 door sliding glass window to 3 a door one, sending our precious daughter to the same private school I went to, and a few other smaller things. Besides those fun things, LuLaRoe has helped me to come out of my shell and be a little more of an extrovert than I was. I have more confidence in myself than I have ever had in my entire life. I was able to prove to myself that I could succeed at something. 


LuLaRoe is more work than I have ever done in my life. Which is why the blog got put on hold. The first 4-5 months were filled with 80 hour work weeks. I've cut back some now, which in reality has been nice because life has been super busy with a 4 year old in pre-k, a busy 3 1/2 year old little boy, and an 11 month old who is walking all over our house!

So are you ready to hear the exciting news?? No, I'm not pregnant (although we've agreed to have a 4th child sometime in the near future!!). Let's go back to December 2015 when our almost one year old dishwasher leaked and got under our laminate floor in the kitchen. So our contractor friend told us that mold would likely appear at some point. Ok, but we had already decided to replace all of our flooring on the main level within the next few years but we were not financially ready at that point to replace all of it. So we just lived with our laminate floors being bubbly in places in our kitchen. Fast forward to a few months ago. I decided to lift up our long runner rug in the kitchen and what do I find?? MOLD! With 2 toddlers and a baby crawling/walking all over, it was time to do something about this whether we liked it or not.

Major bummer... I painted all of the kitchen cabinets and painted the countertops around August/September of last year. All of my precious time that was supposed to last us a few years now wasted :(


The good/bad part? This project has SPIRALED out of control haha. We knew a new kitchen was in the works for about 3-5 years down the road. This would need to happen at the same time we replaced all of the main level flooring because this mama had some BIG PLANS! We're talking knocking down walls, moving the laundry room from the main level to the second, and completely changing the layout of the kitchen. So the time has come to get this project rolling and I would love to take you on this journey with me. 

We are about to take on a kitchen renovation, new flooring on the main level, moving the laundry upstairs, a new master closet, and a new master bathroom (which also has mold in it lol). This project won't get started until January/February because we did not want our house to be a construction zone for the holiday season. This gives me lots of time to go over my plans and material decisions with you all! I am super excited to reveal my HUGE kitchen plans! So let's get this blog rolling again so we can have some fun :)

Sidenote: I am so thankful for my LuLaRoe business that has provided us the income to be able to tackle these huge projects. If you love LuLa as much as I do or you're new to it, please head over to Facebook and checkout my VIP page where I throw super fun parties for lots of wonderful women.

Tuesday, June 30, 2015

How to Paint Trim

I have been itching to paint the trim in our house ever since we signed the papers at closing! Our house was built in 1994 so this oak trim was pretty popular. All of the trim, doors and even the kitchen cabinets are this color and style.


We went and priced this specific trim at Lowe's because while doing some renovations, we needed to buy some more. It's about $30 for 8 feet... not cheap at all! I am very appreciative that the previous owners (and the ones who built the house) didn't skimp because otherwise I would want to replace it.

I'll be honest, after realizing how expensive the trim was, I told myself I could live with it for awhile. I was also dreading having to paint this much trim. It's all over!

There are two other issues. We aren't quite ready to replace the doors (we definitely want to but other things are taking priority) so once I paint the trim around the doors, it might look a little funny.


The other issue being the windows. I will most likely not be able to get out the panes inside of the window that are the orangey trim color. So those will have to stay that way until we need to replace the windows. I'll end up with white trim around an orange window frame with orange panels but I guess it's something I can live with for a few years.


I recently painted our half bathroom on the main level and decided to get all crazy and finally paint the trim in there as well. This sparked the insane person inside of me and I said, "I'm ready to start painting ALL of the trim. Bahahahaha!!!" Ok, that was supposed to be my attempt at an evil laugh. Really I am crazy because I have a nursery that isn't even started, a master bedroom that I intend to paint, and a million and one projects up my sleeve.

But alas, here we go with my tutorial on how to paint trim.

First you want to thoroughly clean your trim. You might be surprised at how dirty it is! I just used a damp rag but you could also use a little soap if you think they need it. Just make sure to go over it again with a clean rag to get all the soap off.


Then I took a 180 grit sanding block and lightly scratched the surface of the trim. You want to get rid of the shine so the paint can stick well.


Then I took another damp rag and cleaned the dust off of the trim as well as the floor.

The next step is to tape your floors and walls. I used blue painters tape because it rips off easily and doesn't peel away your paint. If you are going to be painting your walls in the near future, then there's no need to tape them off.


Next you'll want to use a primer. Some people don't recommend this step but I really feel it will help your paint hold up better and longer. It also has stain blocker in it so your white paint shouldn't turn yellow in a few years.


In my bathroom the walls were going to be the same color as the trim so there was no need to tape off the walls. Yeah!!


I also painted the trim in my hallway. I was giddy with excitement over this! I did tape off the walls as you can see because I had already painted these a few months ago and wasn't too excited about the idea of doing touch ups when I was done.


For the paint I just used white paint right off the shelf from Lowe's. I chose a Satin finish. I love Satin because it gives it a tad more shine then the walls but doesn't have a blinding effect like semi gloss. Semi Gloss and Satin are the two most popular sheens for trim. I also paint my doors in the same sheen as the trim, so keep that in mind.

I am completely amazed at how different it now looks.


Let's look at how much brighter and lighter it looks compared to the old trim.


The old trim was dark and made your eyes glance down at the floor making the room feel smaller. With the white trim, your eyes are free to glance up at the walls and towards the ceiling so the room feels bigger.

Keep in mind that it may take a few weeks for your paint to completely cure. You may notice that a chip happens easily, especially those first few days. I haven't had this happen yet in this house but it didn't happen in my last house. Just sand down that small spot and repaint it.

Being the crazy person I am, I even painted the trim around the door.


You can leave your trim as is but I like to use to caulk to cover up nail holes and also fill in the space by the wall. I'll have a tutorial for that coming up soon. :)

Next up is painting that front door. I told you, I am going project crazy over here. My husband might send me to the looney bin soon!

Tuesday, March 17, 2015

Part 1: Creating a Coffee Bar

When we moved into our home I was so excited about this space. It is on the opposite wall of the kitchen sink.


Although I was not super excited about that desk. I wanted more storage and I really didn't want a desk in the kitchen.


Another problem is that they make refrigerators bigger now and ours would definitely not fit into that small space. So we came up with a plan to make this area work.

Always measure your space before hand and then head to everyone's favorite store... Lowe's! We picked up some project cabinets. These are cheaper cabinets but if you get these wood ones you can paint them any color you want.


These are a temporary fix. When we finally get around to redoing our whole kitchen, these will be replaced as well. But for now they hold up well and I get my extra storage!

We started by taking out all of the lower cabinets and 1 of the uppers.


They didn't put flooring in that one spot so we had to do something to make it even. We just used some leftover carpet tiles we had from finishing up our basement.


We put them in and took some more measurements to figure out where the screws would go.

As you can see, the cabinet doors do not match. I have a few options with this. I plan on painting all of the cabinets in the kitchen white, including these. This will help these blend together more and not be so noticeably different. Another option would be to take off the doors on the top and have more of an open cabinet/shelving look. The third option would be to replace these two upper cabinets with project cabinets as well. Which is probably what we'll end up doing since the kitchen renovation is still a few years away. However, I will wait until everything is painted and see how it looks.


On Thursday I'll share how I created a faux marble countertop!

Tuesday, February 24, 2015

The Kitchen: After

Welcome back! Hopefully you read yesterday's post and saw the before pictures of the kitchen in my last house. Today I'm excited to reveal the after pictures so let's get right into it.

The first thing we did with this kitchen was pick out the flooring. Mistake #1... I should have gotten samples of flooring, cabinets and backsplash and see how they worked together instead of making individual decisions. In the end it does all flow nicely but I now know to look at all my choices in one sitting and dwell on them for a month week.

I knew I wanted a very soft vinyl floor. Easy to clean up with kids, fairly inexpensive, and feels good on the feet. If hardwood were an option, I would have been all over it. Literally, I would have laid all over it!

One problem with my tile sample I got from the store was that it was not big enough for me to see all the colors and patterns I would be getting. However, I did not know that at the time. So when my husband sent me a picture of what the floors looked like installed my instant thought was, "why is there orange in there?!!!" I thought maybe there was something wrong with his camera! Nope.


These floors did hold up nicely with the kids and were a lot softer than I thought they would be which I loved. They were also easy to mop so bonus points for that. Another bonus point is that the vinyl actually stays pretty warm in the cold Michigan weather so keep that in mind if you're considering this.

The cabinets came next. With our time crunch and my inexperienced decorating skills, I literally looked at 3 pictures of kitchens before this process and knew I liked the white look. However, in those pictures the cabinets looked off-white so that's what we went with. We chose Kraftmaid cabinets in the color Canvas. Excellent soft closing cabinets and looked great.

Note to self: I love white cabinets. I will never again get off white cabinets because it doesn't go with my love of all things white and gray.


Mistake #586, we picked Thermafoil cabinets because they were cheaper. Within a year of having these cabinets, they were already peeling off at the bases because of this cheaper option. Lesson learned to save up that money and get the more expensive cabinets because you will use those babies every single day.

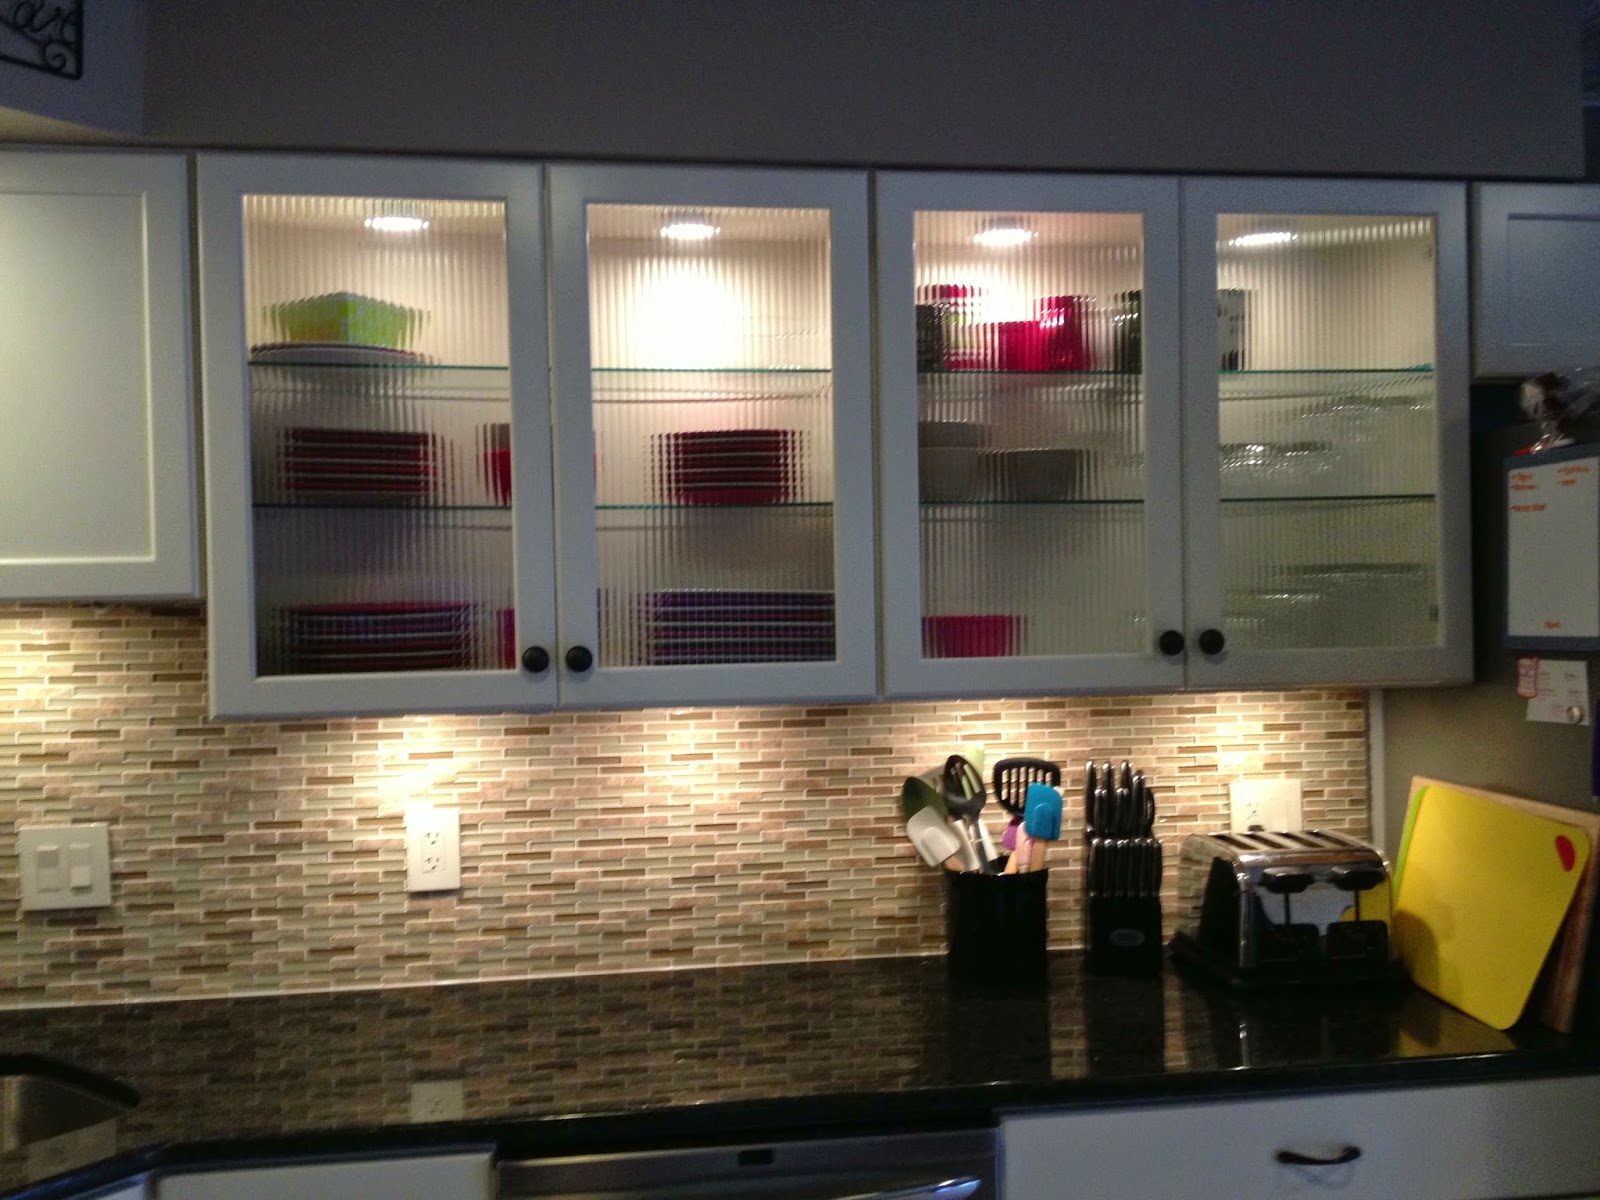
I knew I wanted some of the cabinets to have glass doors. I thought this particular pattern would be interesting and different from the norm that most people do. It had slight ridges in it which was good so it wasn't completely see through. You guessed it, they bothered me a few months later when I really learned what my style was. However, they looked great in the kitchen and functioned well.


I loved the look of black countertops against the white cabinets so we chose a dark granite from Lowe's. I would highly recommend upgrading your countertops from laminate to granite. The granite was my favorite part of the whole kitchen.

The backsplash was next. One day the tile guy showed up and I knew what I wanted in my head (which was more of a stone look) and he changed my mind. He said he brought some other samples of what was more in style now and my husband and I made a split second decision to go that route. Good decision? Yes.


We picked this color combo because it matched the floor. In the end I am happy we had them match. This room was all about the tan and brown. Which would soon begin to bug me because of my love for all things gray.

Meet our pretend island. This kitchen was definitely a good size but not quite big enough for a real island. A few months later I actually put a counter height small table in the middle of the room with two chairs so that the kids could eat in here while I was doing dishes or other random things you do in the kitchen.


There she is, the big kitchen reveal! I learned so much with this renovation but it really wasn't until after I had lived with it for a few months. I figured out my style, what I like and don't like, and what works best for our family. All of which really helped us in choosing our current home and will help with future renovations.


Monday, February 23, 2015

The Kitchen: Before

I had a love-hate relationship with my kitchen in my last house. We only had a month between the time we purchased the home and when we needed to get stuff ordered so the pressure was on. Like I have mentioned before, I had very little decorating experience at this point and was basically clueless. If I could go back and tell myself one thing, it would be to research. Spend hours looking at online photos or magazines of that specific room. You'll start seeing a pattern develop. Similar wall colors in your pictures, light versus dark cabinets, or lots of wood versus an all white room. You'll eventually get a feel for what you like and don't like. Then from there start planning out your room based on your favorites.

It wasn't until about 6 months after the kitchen was finished that I started realizing what I did and did not like. It was a great learning experience though and I'm glad I had the opportunity to completely renovate this room.

Let's start at the beginning. The before kitchen had red carpet, outdated cabinets, a yellow countertop and did not scream "cook in here" to me.


We live in a small town so our choices were limited with kitchen design companies. We also had limited time to make our decisions and lived 2 hours away. So we decided to work with Lowe's because we could use the one closest to us at the time and wouldn't have to drive 2 hours every time we needed to talk to them.

One of the things I realized post-renovation was that we could have changed the layout in the kitchen. It had never even crossed my mind before nor did the sales associate anyone else suggest it. It's ok, I spent the next 2 years coming up with my own changes in my head and then telling my husband what we should have done. I'm sure he appreciated me agonizing over it for that long.


If you take anything away from this post, please please please take your time with big investments like this. If you are planning a huge remodel, be patient. Really know what you want before you jump in with both feet.

My husband and cousin did the demo part to save us some money. We actually ended up reusing some of the cabinets and countertop in our basement for storage. We also took this time to do some electrical and drywall work. We added a water line for our fridge as well. So many things to think about!


Tomorrow I'll show you the after pictures and give some more tips that will maybe help your future renovations!