Showing posts with label paint. Show all posts

Thursday, December 6, 2018

Whole House Color Inspiration And How The Sun Plays A Part

Tomorrow is closing day for our new house and I've been busy these past few weeks narrowing down my color choices. I really want to do the main floor and hallway leading upstairs all the same color. This can be SUPER tricky because the light in one room will be different than the light in the other rooms.

The direction your house faces plays a part. You may get direct sunlight in one room and then on the other side of the house not get any sunlight. Of course we can't forget how the lights you use in your home can affect paint color as well.

Our last house faced North and South with the front facing South and back facing North. I never had any direct sunlight in the back of the house and I really hated it. That's pretty much where we lived all day long. And there was only 1 small window in the front of the house so natural sunlight was super minimal. There were many windows in the back so that helped keep it not so dreary but I missed that sunlight! 


The window to the left was the only good window facing the South and the only one that let in direct sunlight. Wall Color: Sherwin Williams Wordly Gray

Our new house faces North (2 front rooms and 2 bedrooms will face North), with the back facing South (living room, dining room, kitchen, and 2 more bedrooms). So we will have more sun in the back of the home where I will be spending a majority of my day (aka the Kitchen of course).

It's important to keep in mind that paint colors also change tone during different times of day. In the morning it's bright and airy. In the evening the color will look different. And here in the midwest, the winter months are overcast and dreary and will also change the color of paint. 

Basically all this to say, you can paint your whole house one color but keep in mind, every room may look different just because the sun, dreary weather, lighting, and time of day all play a factor.

In my last house I chose to do a medium color, a greige called Worldly Gray by Sherwin Williams. I chose this color because we had off-white IKEA kitchen cabinets. The darker color of the wall helped to "lighten" the creamy color of the cabinets and tricked your eye into thinking they were white.

In these 2 pictures you can see how the darker walls really make the cabinets POP and you can't even tell they're more of a creamy color.


The wall to the left and the wall to the right are painted the EXACT same color. The left gets a lot of natural light from a huge window while the right wall is a hallway and is darker. The paint color looks completely different in both spaces even though it's the same. 

What's on trend now for houses is a very light, almost non existent color. Some people even opt for an all white interior to give it that modern, minimalist vibe. I am really hoping to have a super light gray/greige color that's warm and inviting but you're almost asking yourself if there's actually color on the walls. Here are some examples of what I'm crushing on.


 Source: Google

 Source: Google

Source: Google

Source: Google

Source: Google

This coming week we will be installing new lights in our house and I will be putting color samples up on the walls. I will keep you updated and give you a step by step guide to choosing the perfect paint color!

Thursday, December 31, 2015

DIY Painting Laminate Countertops

This is the post that so many of my amazing friends have been waiting for... How to paint your countertops!! If you're here, I'm guessing you have some seriously awesome countertops that you just can't wait to get rid of love :)

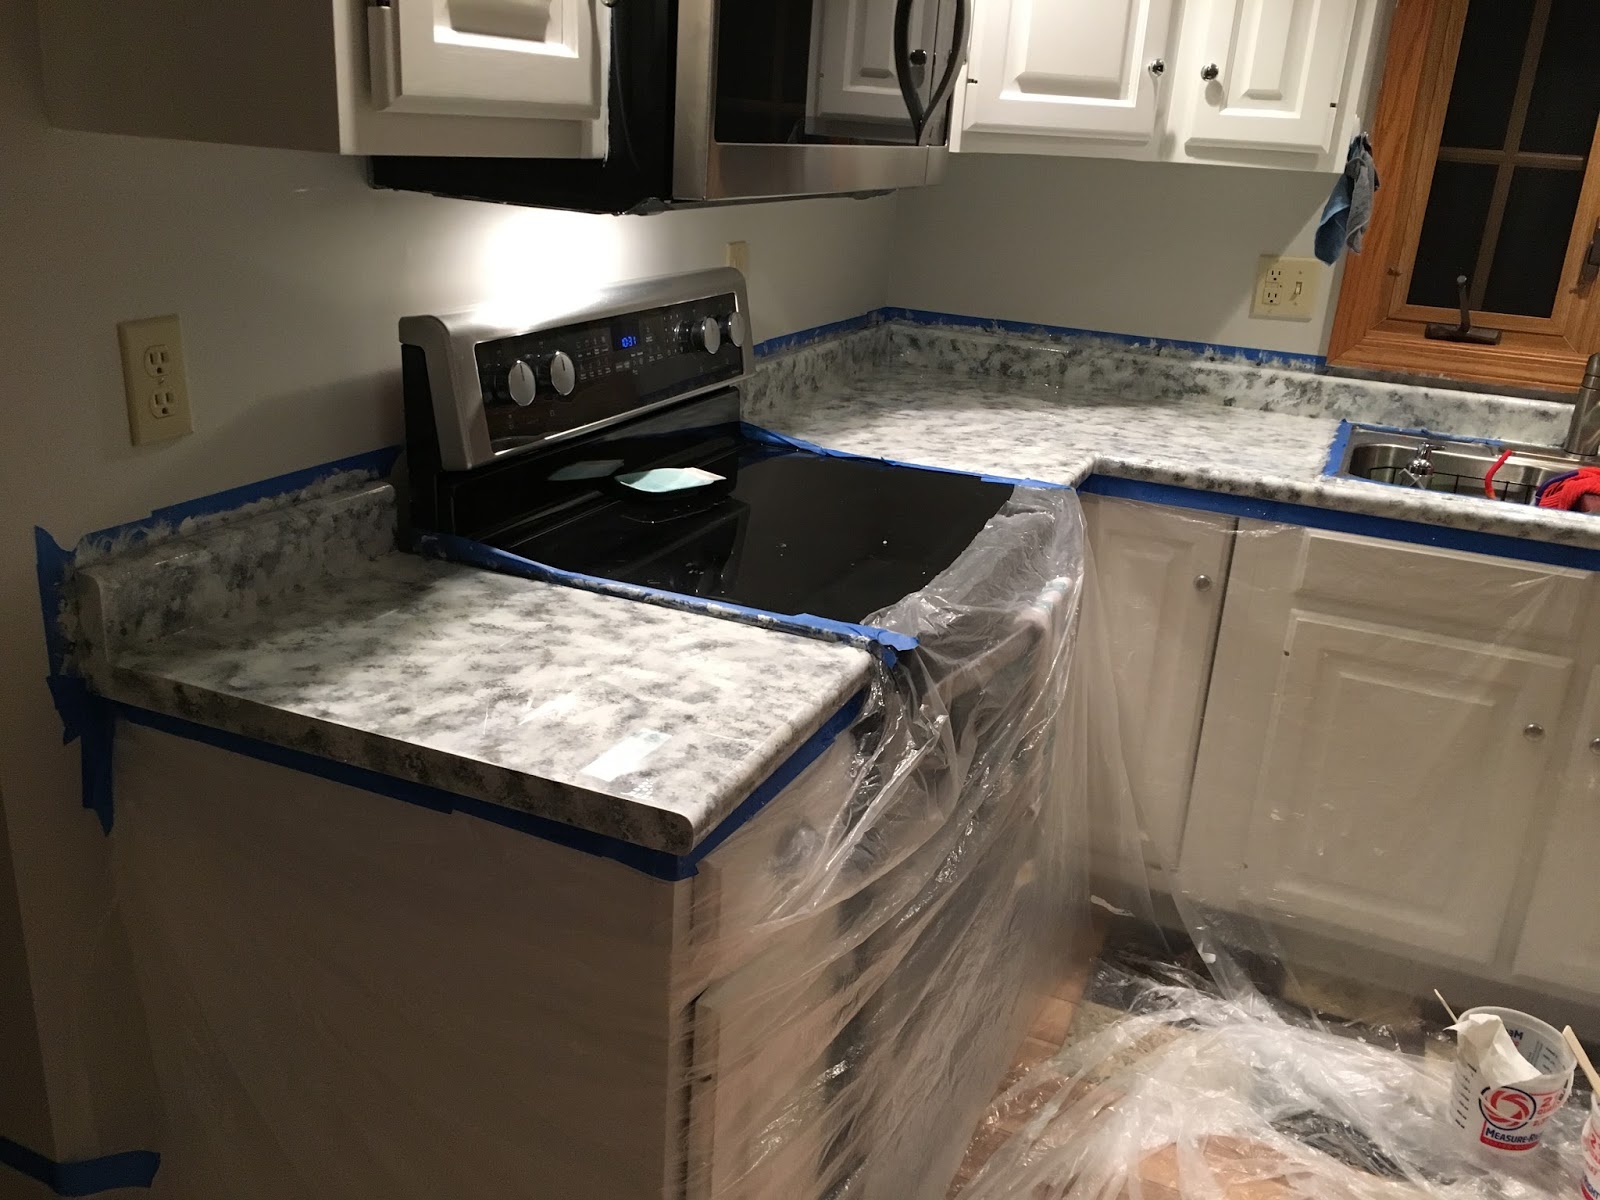
I had some amazing GREEN laminate countertops. I guess that was the thing to do in 1994 when our house was built?? I have hated them since the day we moved in but other things have eaten up our budget. After 11 months, I finally got sick of seeing these green monsters that I decided to take the plunge and use craft paint to change them. You can also use the paint that you put on your walls!! I will give you detailed step by step instructions on how to make your countertops look like granite for way less than the price of real granite.

Here are a few before pics:


It would be helpful to have a sample picture of the look you're going for. Either grab one at Lowe's or look samples up online. You'll also need to know how many square feet of counter space you have. I have 39 square feet. It's important to know that for your top coat.

Plan for a whole day to complete the entire process and then 72 hours for the top coat to fully cure.

Supplies you'll need:
1. Latex gloves
2. Sand paper (I used 150 grit)
3. Drop cloths (I used 3 plastic ones)
4. Painter's tape
5. A few plastic buckets (in the paint aisle at Lowe's)
6. Lighter or small blow torch
7. Paper plates to put your paint on and dab with sponge
8. Primer (I used Zinsser Bulls Eye water based primer)
9. Paint roller, paint trays and paint sticks
10. Small foam brushes (I bought 3 just to be safe)
11. Acrylic craft paint (I bought mine at Hobby Lobby) I also used 2 small samples of paint I   used on my walls from Sherwin Williams
12. Craft sponge (Hobby Lobby - I bought a big sponge in the painting aisle and cut it up into many pieces)
13. Top Coat - you have 2 options here and I will talk about them later but I bought 4 boxes (32 oz each) of Enviro Tex Lite. I found this at Hobby Lobby in the same aisle as the acrylic paint. Each box covers up to 8 sq feet which is why you need to know how much counter space you have. Your other option is to use 1-2 cans of Polycrylic.


I had most of these supplies already so my cost was a little lower than if you were buying everything new. I had to grab a few extra bottles of acrylic craft paint and 4 boxes of Enviro Tex Lite (the top coat) so my total was about $95 for this project. Use 40% off coupons at Hobby Lobby for the top coat and it will save you $14 a box!

I took as many pictures as I could but I had gloves on for the majority of this project so I wasn't able to capture everything. But I will try to give you step by step instructions.

Here we go!

Step 1: Sand counters. Honestly I don't think this did anything. Maybe I didn't rub hard enough but once I wiped off the residue, they felt pretty much the same as they did before. But it made me feel better. This helps the primer stick better but on the can it says no priming necessary so who knows! Wipe it all off really well with a wet rag.


Step 2: Prime. Make sure you have your walls and cabinets taped off first. I did 2 coats of primer and used a small roller for this. It wasn't perfect but I knew all of my other paint would cover this up. Wait 1 hour for it to dry in between coats and before you start painting with your sponge. If you choose to do black countertops, get a primer that you can tint black.


Step 3: Use your sponge to make a design. My one piece of advice is to PRACTICE before you do this on a piece of paper. If I had done this it would have saved me 2 HOURS! I could not get my technique down for the life of me and was so frustrated that it wasn't turning out great. But then I tried something different with the sponge and loved where it was going. Once I got my technique down it took me (another) 2 hours to complete this step.

These are the colors I used from Hobby Lobby (I did not use Slate Gray).  The metallic I used sparingly but I absolutely love the shine it gives! I also used a white I already had and a very light gray I used on my walls in my home. I bought 4 bottles of each color just to be on the safe side and I almost used all of them. *Grey Sky, Metallic Silver, Grey*

I also purchased a small container of very fine glitter and threw it on sparingly after one of my many coats. It's very subtle but I absolutely love it!


My counters looked like this after my initial few coats. I was not liking where it was going.


So I had to basically start all over but at least my primer was fully covered at this point.

Then I started dabbing just a small section of the sponge on the counters and it looked like a dalmatian dog puked all over my counters! Then after the 2 hour mark, I decided to use the whole sponge and it looked so much better. I knew this was the direction I wanted to go. One color at a time it was starting to look like I wanted.

Left: the way I wanted it to look   Right: Dalmatian dog gone wrong


I wanted lighter counters with a hint of dark in them. If this is the look you're going for then I recommend you start with your darkest color first. Work your way to the lightest. After I did this, I went back with one of my medium shade colors to blend everything in. It really depends what look you're going for and that is why you should practice first.

In the end they came out looking like this:


Here's a close up and to me they look like real granite!


Step 4: Top Coat. You have 2 options here. I will tell you what I did and tell you about the other down below. I used Enviro Tex Lite. It is amazing and even though I was afraid to do it, I am so glad I did and highly recommend this one. It is food safe which is a huge plus for this mommy with 3 little kids. It is super thick and super shiny. It goes on nice and smooth. It feels amazing and I wish you could touch it through the computer! Note: While you totally could do this step by yourself, I found it was much easier to accomplish with 2 people.

You will need to read the directions very carefully so I won't go into all the details but you need to pour it on quickly (within 20 minutes of mixing it up) and you will need a heavy duty lighter or small blow torch. You can also just use your breath but that really depends on your counter size. There was no way I was going to blow on 39 square feet of space! I started out using a lighter and that worked fine but when my mom offered me her small blow torch she uses for crème brulee, it was amazing and did the job much faster.

The reason for the heat is to pop the small bubbles that form while you're mixing and applying the top coat. I'll be honest and say that I'm positive I didn't get ALL of the bubbles out but so far the counters feel super smooth.

The box says it will harden within 24 hours and will be ready for full use in 72 hours. It also says it dries best when your house is 70-90 degrees and there's no humidity. I found that at 10 hours it was still tacky and my house was at 68 degrees. Once I upped it to 70 degrees the drying process went faster.

Option 2: Polycrylic. From what I read this will take 8-9 coats and is put on by a foam roller. It is not food safe and won't last as long as the Enviro Tex Lite (which is equal to 50 coats!). It will probably need touch ups every now and then where as the one I did, at least from what I've read, people have had it last 5 years. It also won't be super shiny and super smooth. However, this is easier and less risky to apply and you can do it yourself. You will probably want to sand between coats to keep it from getting too rough.

Now it's time for the AFTER pictures!!


I am a perfectionist and Type A personality so going into this was a little terrifying. I was worried that I would be too picky or would keep going for 20 hours and still not like how it was turning out. But trust me, you'll know when it's done. It will look amazing to you and you'll be giddy with excitement!!

Wednesday, July 22, 2015

The Process of Painting a Room

I am getting ready to start painting the nursery (EEEEK!!) so I thought now would be the perfect time to share the process of painting a room. It's fairly simply but I thought writing out step by step instructions may help. Painting a whole room may seem like a big job but it is so rewarding in the end. Ok, maybe I'm just a crazy painting freak. :)

Step 1: Pick out your paint color

This may seem like an easy task but it can be overwhelming. Once you've narrowed down what color you want (blue, gray, green, etc) then get a few different color strips in those shades. I stick the swatches right on the wall and take a day or two to see what they look like in the morning, afternoon, and evening. (In this case I was looking at colors for the door).


Step 2: Buy samples of a few different shades

Once you have your swatches narrowed down to anywhere between 2-5, go to the paint store and ask for samples of those colors. I usually go to Sherwin Williams and they're around $5 a sample. I let these sit there for 2-5 days to really get a good idea of what the color will look like. Keep in mind the color will change in the morning vs evening and if there's sun or rain. Also if your painting a hallway, the color may be close to a window in one area of the hallway but then have no natural light in another area. This will make your color look different so be sure to paint multiple areas of the room/hallway.

I've learned not to rush your decision because you don't want to spend 8 hours painting a room only to hate it a few days later. I've done that way to too many times! I just get so excited to start painting and making a difference that I was always rushing my color decision. In my current home, I took my time and am very happy with the colors I have chosen.


Step 3: Putty any holes, sand and clean your wall

Ok, that's like 3 steps in one but they all go together. You could also do this before you start the other steps but because the above two steps usually takes me a week, I like to do this while I'm deciding on which color to use.

There are probably nail holes from pictures or even some places where the wall was chipped a little. You want to get your putty and cover these up.


Sand down those areas after they have dried.


Then go over the whole room with a damp rag and wipe off the walls and trim really well. If you're moving into a new house or the walls haven't been cleaned in a few years, it's a good idea to put a little soap in with the water and wash the walls. Make sure to go over them a second time with a  damp clean rag to remove any excess soap.

Step 4: Cut in the corners and around trim

It's time to start painting! You can take a small paintbrush or a regular sized one to do this. I prefer an angled brush for this job. If you don't have a lot of experience with "cutting in" then use blue painter's tape to cover up the trim pieces.


Tuesday, June 30, 2015

How to Paint Trim

I have been itching to paint the trim in our house ever since we signed the papers at closing! Our house was built in 1994 so this oak trim was pretty popular. All of the trim, doors and even the kitchen cabinets are this color and style.


We went and priced this specific trim at Lowe's because while doing some renovations, we needed to buy some more. It's about $30 for 8 feet... not cheap at all! I am very appreciative that the previous owners (and the ones who built the house) didn't skimp because otherwise I would want to replace it.

I'll be honest, after realizing how expensive the trim was, I told myself I could live with it for awhile. I was also dreading having to paint this much trim. It's all over!

There are two other issues. We aren't quite ready to replace the doors (we definitely want to but other things are taking priority) so once I paint the trim around the doors, it might look a little funny.


The other issue being the windows. I will most likely not be able to get out the panes inside of the window that are the orangey trim color. So those will have to stay that way until we need to replace the windows. I'll end up with white trim around an orange window frame with orange panels but I guess it's something I can live with for a few years.


I recently painted our half bathroom on the main level and decided to get all crazy and finally paint the trim in there as well. This sparked the insane person inside of me and I said, "I'm ready to start painting ALL of the trim. Bahahahaha!!!" Ok, that was supposed to be my attempt at an evil laugh. Really I am crazy because I have a nursery that isn't even started, a master bedroom that I intend to paint, and a million and one projects up my sleeve.

But alas, here we go with my tutorial on how to paint trim.

First you want to thoroughly clean your trim. You might be surprised at how dirty it is! I just used a damp rag but you could also use a little soap if you think they need it. Just make sure to go over it again with a clean rag to get all the soap off.


Then I took a 180 grit sanding block and lightly scratched the surface of the trim. You want to get rid of the shine so the paint can stick well.


Then I took another damp rag and cleaned the dust off of the trim as well as the floor.

The next step is to tape your floors and walls. I used blue painters tape because it rips off easily and doesn't peel away your paint. If you are going to be painting your walls in the near future, then there's no need to tape them off.


Next you'll want to use a primer. Some people don't recommend this step but I really feel it will help your paint hold up better and longer. It also has stain blocker in it so your white paint shouldn't turn yellow in a few years.


In my bathroom the walls were going to be the same color as the trim so there was no need to tape off the walls. Yeah!!


I also painted the trim in my hallway. I was giddy with excitement over this! I did tape off the walls as you can see because I had already painted these a few months ago and wasn't too excited about the idea of doing touch ups when I was done.


For the paint I just used white paint right off the shelf from Lowe's. I chose a Satin finish. I love Satin because it gives it a tad more shine then the walls but doesn't have a blinding effect like semi gloss. Semi Gloss and Satin are the two most popular sheens for trim. I also paint my doors in the same sheen as the trim, so keep that in mind.

I am completely amazed at how different it now looks.


Let's look at how much brighter and lighter it looks compared to the old trim.


The old trim was dark and made your eyes glance down at the floor making the room feel smaller. With the white trim, your eyes are free to glance up at the walls and towards the ceiling so the room feels bigger.

Keep in mind that it may take a few weeks for your paint to completely cure. You may notice that a chip happens easily, especially those first few days. I haven't had this happen yet in this house but it didn't happen in my last house. Just sand down that small spot and repaint it.

Being the crazy person I am, I even painted the trim around the door.


You can leave your trim as is but I like to use to caulk to cover up nail holes and also fill in the space by the wall. I'll have a tutorial for that coming up soon. :)

Next up is painting that front door. I told you, I am going project crazy over here. My husband might send me to the looney bin soon!