Tuesday, June 30, 2015

How to Paint Trim

I have been itching to paint the trim in our house ever since we signed the papers at closing! Our house was built in 1994 so this oak trim was pretty popular. All of the trim, doors and even the kitchen cabinets are this color and style.


We went and priced this specific trim at Lowe's because while doing some renovations, we needed to buy some more. It's about $30 for 8 feet... not cheap at all! I am very appreciative that the previous owners (and the ones who built the house) didn't skimp because otherwise I would want to replace it.

I'll be honest, after realizing how expensive the trim was, I told myself I could live with it for awhile. I was also dreading having to paint this much trim. It's all over!

There are two other issues. We aren't quite ready to replace the doors (we definitely want to but other things are taking priority) so once I paint the trim around the doors, it might look a little funny.


The other issue being the windows. I will most likely not be able to get out the panes inside of the window that are the orangey trim color. So those will have to stay that way until we need to replace the windows. I'll end up with white trim around an orange window frame with orange panels but I guess it's something I can live with for a few years.


I recently painted our half bathroom on the main level and decided to get all crazy and finally paint the trim in there as well. This sparked the insane person inside of me and I said, "I'm ready to start painting ALL of the trim. Bahahahaha!!!" Ok, that was supposed to be my attempt at an evil laugh. Really I am crazy because I have a nursery that isn't even started, a master bedroom that I intend to paint, and a million and one projects up my sleeve.

But alas, here we go with my tutorial on how to paint trim.

First you want to thoroughly clean your trim. You might be surprised at how dirty it is! I just used a damp rag but you could also use a little soap if you think they need it. Just make sure to go over it again with a clean rag to get all the soap off.


Then I took a 180 grit sanding block and lightly scratched the surface of the trim. You want to get rid of the shine so the paint can stick well.


Then I took another damp rag and cleaned the dust off of the trim as well as the floor.

The next step is to tape your floors and walls. I used blue painters tape because it rips off easily and doesn't peel away your paint. If you are going to be painting your walls in the near future, then there's no need to tape them off.


Next you'll want to use a primer. Some people don't recommend this step but I really feel it will help your paint hold up better and longer. It also has stain blocker in it so your white paint shouldn't turn yellow in a few years.


In my bathroom the walls were going to be the same color as the trim so there was no need to tape off the walls. Yeah!!


I also painted the trim in my hallway. I was giddy with excitement over this! I did tape off the walls as you can see because I had already painted these a few months ago and wasn't too excited about the idea of doing touch ups when I was done.


For the paint I just used white paint right off the shelf from Lowe's. I chose a Satin finish. I love Satin because it gives it a tad more shine then the walls but doesn't have a blinding effect like semi gloss. Semi Gloss and Satin are the two most popular sheens for trim. I also paint my doors in the same sheen as the trim, so keep that in mind.

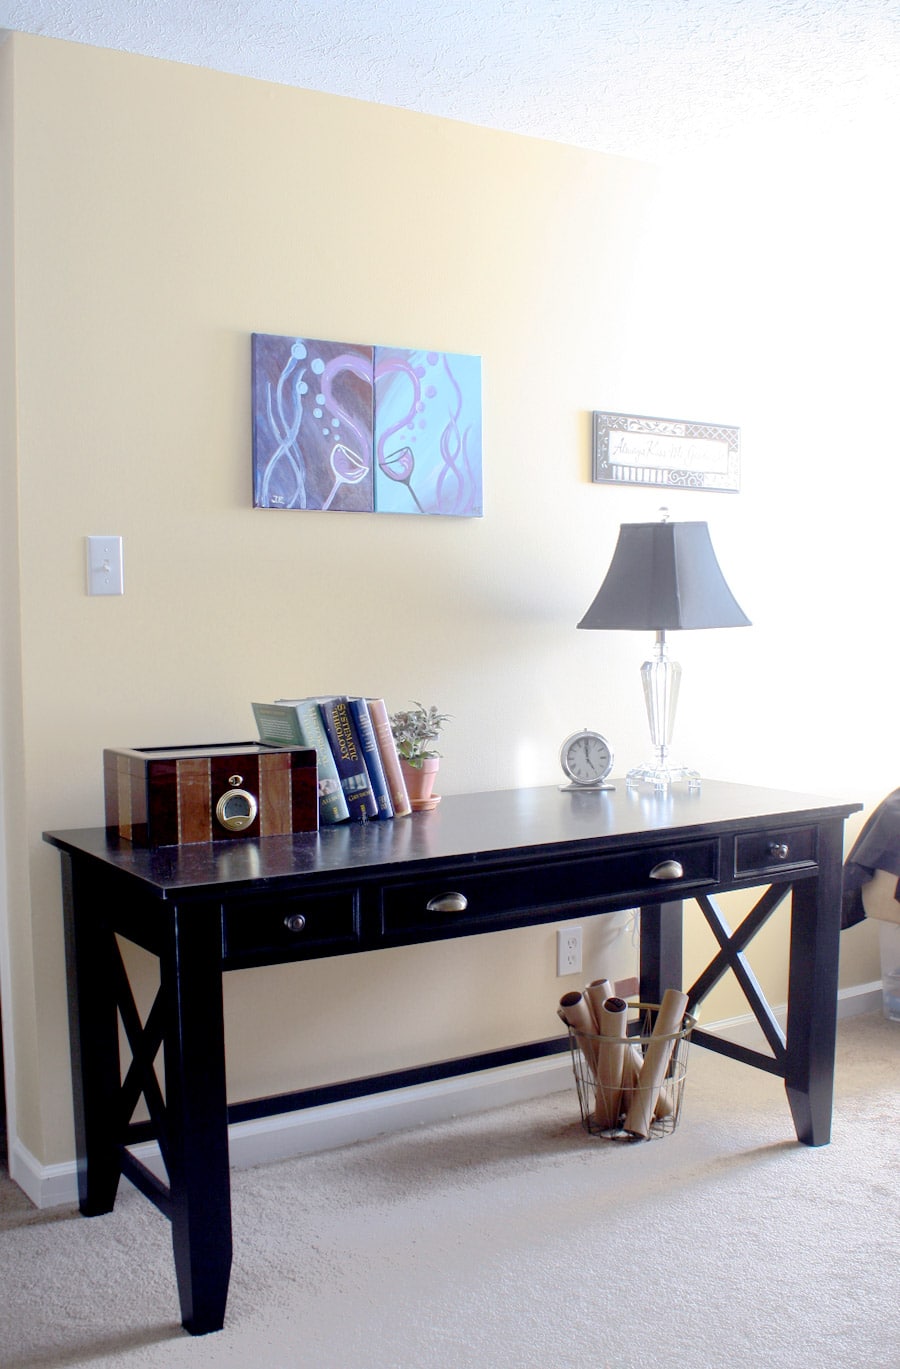
I am completely amazed at how different it now looks.


Let's look at how much brighter and lighter it looks compared to the old trim.


The old trim was dark and made your eyes glance down at the floor making the room feel smaller. With the white trim, your eyes are free to glance up at the walls and towards the ceiling so the room feels bigger.

Keep in mind that it may take a few weeks for your paint to completely cure. You may notice that a chip happens easily, especially those first few days. I haven't had this happen yet in this house but it didn't happen in my last house. Just sand down that small spot and repaint it.

Being the crazy person I am, I even painted the trim around the door.


You can leave your trim as is but I like to use to caulk to cover up nail holes and also fill in the space by the wall. I'll have a tutorial for that coming up soon. :)

Next up is painting that front door. I told you, I am going project crazy over here. My husband might send me to the looney bin soon!

Wednesday, June 24, 2015

Master Bedroom Updates

You've heard me talk about it before in this post, but so often the master bedroom is last on the list of things to get done. Rooms that guests see always get done first - the kitchen, bathrooms, and living room. And of course you want your kids to have awesome rooms. Then last but not least comes your private oasis. The room where you should be relaxing in. A quiet place to escape the chaos of the rest of the house.

If you're anything like me, the master bedroom gets forgotten about... until it's 10:00pm and you start thinking about what color to change the walls or what pictures would make you feel most at peace. No?? Just me?? I am a little crazy like that. :)

I vowed to make the master bedroom a priority when we moved into our home in February. I never even touched the master bedroom in our last house and it wasn't a room I was excited to be in. Now with the baby coming I want to get this room done so I can be excited about it. Plus after 5 1/2 years of marriage, I am ready to have a real adult room instead of a room that's pieced together with broken craigslist furniture and color schemes that don't make sense.

You'll have to excuse the pictures. I've done the best I can but this room has awful lighting for some reason. I'm still trying to figure out the best way to capture this room.

Let's start off with how it looked before we moved in. Dark purple walls. And you can see they didn't even do a good job at painting! It was dark and depressing.


Our master bedroom is actually made up of 4 rooms. The main room where the bed is, a little area that I will be using for my make up station once we get it ready, a walk in closet and a nice huge bathroom (that scares me to death and we have closed the door and not gone in there since we moved in! That renovation will happen down the road). But I'll show you those spaces later on because I really haven't touched them yet.

I decided to paint our master bedroom something other than gray... GASP!! I know, that's a little crazy isn't it?! I have seen Comfort Gray by Sherwin Williams used in many master bedrooms before and thought it would be the perfect pop of color. Isn't this a beautiful bluish/gray color?


Well, it is a beautiful color in the RIGHT LIGHTING. I even put up a few samples on the wall and really thought this would be the color. We have 1 pretty big window in this room but like I said, the lighting is really off in here and it makes Comfort Gray look like Comfort GREEN! Which of course didn't hit me until after we moved in.


We also had the carpet replaced before we moved in. Before it was blue with animal feces all over... GAG! Now it is a beautiful gray color.

The pictures above are being nice. It looks way more green in person and it's just awful when it's dark out. Pure green. No hint of gray or blue anywhere. If it was a blue/gray color I would have loved it and been happy. But I have lived with "Comfort Green" for 4 months and it's time to go.

I had a sample of Gray Owl by Benjamin Moore because it was one I considered for our main level (ultimately I went with Balboa Mist for the main level). So I plopped it on our master bedroom walls as well as baby's nursery and I love it.


So this room will hopefully soon be Gray Owl.

Let's look at a few more pictures after we moved in. I have my awesome $35 chair in here. Which totally doesn't match but I love it in here anyways. The nightstands we got just two years ago when we moved into our last house. They were online at WalMart for around $60 for two. I hate them. Too short, too small and are fake wood. At that point in my life I was about to have a newborn and a 16 month old so decorating was far from my mind. Live and learn my friends.

Then there's the old lamp that really needs to be donated but keeps making its way around the house when needed. It's like 15 years old and does not match anything in my home.


My make up station all lonely over there by itself. To the right you can see part of my craigslist dresser that I had to get when we first got married. It wasn't supposed to last this long and actually did break in this last move. Praise the Lord! It is also fake wood.


Here's where things start to change. It started with 2 lamps from Target. White, bright and a fun pattern.


Although mine wouldn't fit on my teeny tiny nightstand. It's not like I have a ton of stuff on there!


We took a recent trip to IKEA and I pointed out to my hubby that the MALM line was on sale. I have seen hacks of these dressers and nightstands online before that knew that these would work.


At first I thought they would be too big but after living with them for a few weeks they are the perfect size. And really, we do have the room!

I was able to fit all of my clothes in these and get rid of that yucky old dresser.

I still have dreams of my hubby building me a desk but for now we brought up one we weren't using from the basement. I have been wanting one to use for my blogging and it made the most sense to put it in here. Yup, real life with the laundry basket on my chair. :)


Next up on the list is changing the bed. While I wish we could get a king sized bed, it just isn't in the budget right now. I have been dreaming of an upholstered headboard for quite some time now and convinced Hubby that I could make it for around $100. I am hoping to make up some or most of that cost from selling the current frame as well as the old nightstands.

I can't wait to update you on the progress as soon as it happens!

Monday, June 22, 2015

Candlsticks and Spray Paint

If you haven't noticed, I have been all about the spray paint this summer. Repurposing old treasures saves money, let's you be creative, and can completely transform the look of a room. I am having fun!!

I had my husband get me these candlesticks for my birthday this past year. They are from World Market and cost way more then I would normally spend on something like this ($45). I saw some bamboo colored ones in the store a few months prior and couldn't stop thinking about them. However, when I went to order them online I chose the gray color. They're ok. Nothing spectacular. It just reminds me to browse the thrift stores first!


They have a rustic vibe going on and normally I'd be fine with that. I love a mix of modern and rustic design elements. However, I wanted two of these to be on my new DIY Wood shelves which already have that rustic feel. I felt like it was a little overkill with all the rusticness. So I thought why not spray paint them. And why not spray paint them one of my favorite decorating colors, blue! I am loving all shades of blue right now.

I got out my primer because I wanted to make sure the blue looked gorgeous and stuck to these babies.


Then I used Rust-O-Leum's Navy Blue in Gloss. A few quick coats (ok it literally took me a day to finish these things because it was so humid out!) and I absolutely love the way they turned out. They add some shine and a pop of color which is just what I was looking for.


A quick and easy change that I absolutely love!

Friday, June 19, 2015

Friday Faves

I haven't done a Friday Faves in a while. Somehow I've been super busy but I feel like I have nothing to show for it! I have started some house projects but nothing is completed yet. My to-do list is super long before my baby boy comes in November.

Here's some weekend reading for you, incase you're bored or stuck inside because of rain!

Kate at the Small Things Blog is amazing. She's down to earth, beautiful and is totally real about her life. Now if only I had the time and will power to do my hair everyday like she does! I have a feeling this will only get worse with baby #3. Here she has a simple but cute side swept braid.


The girls at The DIY Playbook have this stunning DIY Marble Tray. It looks like it could cost well over $100 but it's only about $15 to make. I may have to give this one a try. It would look amazing in the center of a dining room table with some fresh cut flowers.


You all know Jen is one of my most favorite bloggers. She came up with these travel and emergency kits to keep in her car. I think they're perfect for all the summer travel that will be happening.


I have been wanting my husband to build me a desk for a few years now but as always, other things have taken priority. I think I'll save these plans for this DIY Writing Desk because it is gorgeous! It would be lovely in white, gray, navy blue or even aqua.


As always, I must add in a food post. Sweet potatoes are so good for us. They have Vitamin A, Vitamin C, Vitamin B-6 as well as potassium and manganese. These Sweet Potato Black Bean Enchiladas might sound a little crazy but I've been seeing these all over the internet lately!


I hope you have a great weekend!