Happy Friday! Last weekend was a total blur. On Friday I had to wake up at 3:45am to pick up my sister from the airport! We had been scheming for 3 months to surprise our parents. She lives in L.A. and only makes it home about twice a year so we jammed in as much stuff as we could. Including my son's 2nd Birthday, a family gathering, and also having my in-laws in town. I am still trying to catch up on sleep!
This weekend will be a bit more relaxed and hopefully I can get a few things done around the house.
Incase you get bored, here are some great blogs you can catch up on.
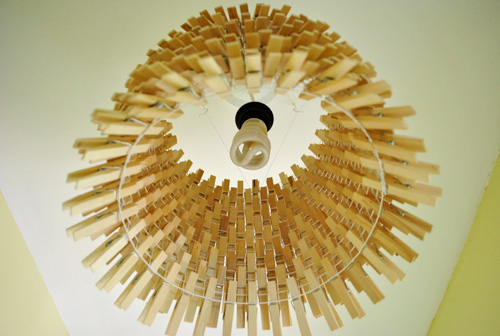
This Clothes Pin Light is just the most creative thing I've seen in a while. I love that they put it in their laundry room.
How darling is this DIY Mason Jar Hanger?! I could go a little crazy and hang these all over the outside and inside of my home!
Since I am in baby planning mode, I came across this super cute nursery. The colors could very well be used for a bedroom as well. She did a great job!
This DIY Floral Print Artwork has the most beautiful colors. I can't believe it's fabric behind those letters!
I know you have been waiting this entire post for a food picture so here it is. I thought this Citrus Parfait would be a great summer time treat, especially on these hot days. You could even top it with my homemade granola recipe!
A few weekends ago my amazing husband built our kids a playset. Our new backyard was desperately calling for it. I also knew it was going to be a very long summer if the kids had to rely on this pregnant mama for entertainment outside! I'll be the one in the wet maternity bathing suit sitting in the kiddy pool. :)
We decided to purchase a kit to save us time cutting wood, figuring out what extra pieces we would need to buy, etc... As it was, it took my husband about two and a half days to finish (my dad helped one of those days). So it wasn't a quick and easy process.
Kid's playsets can be super expensive. We saw some for $3,000 when we were looking! There was a nice one at Costco for $999 but we really weren't ready to spend that much either. We knew we wanted a slide, swings, a small play area and a rock wall would be a nice bonus. After some looking around, we found one we liked and decided to price match it. Kmart actually had the best deal coming in at $475. We chose this one, Backyard Discovery Somerset Cedar Swing Playset (say that 10 times fast!).
We opened the box and made sure all the pieces were there.
Then my husband had the brilliant idea to set up a little work space for the bazillion pieces you get.
He had some helpers at the beginning. Then they realized there were better things to do. :)
My husband started to build some of it in our driveway then transported those pieces to the backyard when it was time.
Our backyard slopes downward a little and isn't flat (the joys of being by woods). So we had to do a little digging to even things out. Well, since my husband is probably reading this post I should correct myself and say that "he" had to do some digging. I was taking care of the kids, of course.
We are very happy with this playset. My husband did say he wishes the wood was thicker and if we would have built it from scratch, we would have used thicker boards. Well I mean "he" would use thicker boards. :) The kids love this thing and now we have all the neighborhood kids over more often then not (which my kids love).
View from the deck with our neighbor friends over.
This has kept the kids occupied more often than not and we are very happy with how it turned out.
If you've been on Pinterest the past few years then you know a thing or two about burlap wreaths. They're on front doors, walls, the mantel, and hanging off of mirrors. They come in all different sizes and colors. The best part about making your own is that you can decide how you want them to look.
I have been wanting to make one for quite some time but I'll be honest when it comes to DIY, I have no confidence. This means I usually don't take on a DIY project because I'm scared it will turn out wrong. I'm also a perfectionist so of course everyone else's DIY projects look amazing but mine are hideous. However, I've been trying to boost my confidence in this area by telling myself that if I never try, I'll never get better. I'll never know if I'm good or not. The big bonus is you can save a lot of money if you make something yourself!
So here goes nothing! I made my very first burlap wreath. I tried really hard to do a tutorial via pictures but it was a little confusing. I did take a few for you. But I think you'll better understand it if you watch this Youtube video that I followed. Keep in mind there are a few different ways to make these wreaths so if this isn't the style you want, please search around.
I started with these materials purchased at Hobby Lobby. I did end up needing another roll of burlap ($9.99 each but use that 40% off coupon!) but didn't use very much of it so I have plenty of extra for another project. I used a medium sized wreath ring ($2.50). And then some pipe cleaners ($.99). To be honest, most people recommend floral wire and I wish I would have gotten that. All I could find was green floral wire when I wanted white or black and I didn't have any wire cutters so I went cheap and just used pipe cleaners. I would recommend using the floral wire though.
As you can see here, the pipe cleaner was used to attach the burlap to the wreath ring. You can't see it once the project is finished but the wire would have been easier to work with and given it more of a clean look.
It is as simple as pulling the burlap through each slot.
When she was done, she looked like this! This literally took me 10 minutes and in the end I was so proud of myself (priceless).
But I had one more trick up my sleeve. I had a leftover monogrammed "M" from another DIY fail (I will be scarred forever) that I wanted to incorporate on this wreath. So I busted out this gorgeous new color of spray paint (of course!). It doesn't have a name on it but I found it at my local Meijer.
I got out my hot glue gun and stuck it on there.
Next I got this ball of twine to hang my wreath with. You could also use some ribbon or even another piece of burlap.
I just tied it on there about 50 billion times.
I used a small command hook on my wall and hung this beauty up on my new stylish entryway mirror.
I love the depth and color it adds to the space. Now it's your turn! I promise it was super easy. :)
I try to post a recipe each week on my Friday Faves. I mean, isn't part of having a Harmonized Home what we cook and eat?! I thought I could occasionally share a recipe with you that we eat often and this homemade granola is one of them (ok well I eat it often).
There are many different types of granola. You can add nuts, dried fruit, coconut or even chocolate. I've tried a few different recipes but I always come back to this one. This recipe is easy to throw together and easy to cook.
Ingredients:
3 cups of oats
1 cup slivered almonds
3/4 cup shredded coconut
1/4 cup oil (I use coconut oil but you could also use canola or olive oil)
1/4 cup brown sugar
1/4 cup maple syrup
Directions:
Mix all ingredients together in a bowl. Bake at 250 degrees for 1 hour and 15 minutes. Stir every 20 minutes.
I store mine in a container like this.
My favorite way to eat this is with yogurt and some fresh berries. Strawberries, raspberries, blueberries and maybe throw in some banana slices too. You could add it to oatmeal or even make a smoothie and add some on top. Maybe just add some milk and it could replace your sugary cereal.
No Friday Faves tomorrow as I have a super busy weekend ahead (how can my son be 2 years old already?!) but check back Tuesday for a new DIY tutorial. :)
Are you keeping up with our Spring Cleaning Challenge? We're on Week 3 so only one more week to go. So far you should have decluttered a spot in your home and have a sparkling new refrigerator!
I went back and forth on what to do this week. My motivation is lacking in the cleaning department because we have another big project we're working on, trying to get it done before my son's birthday on Sunday. How can my little man be 2 years old already?!
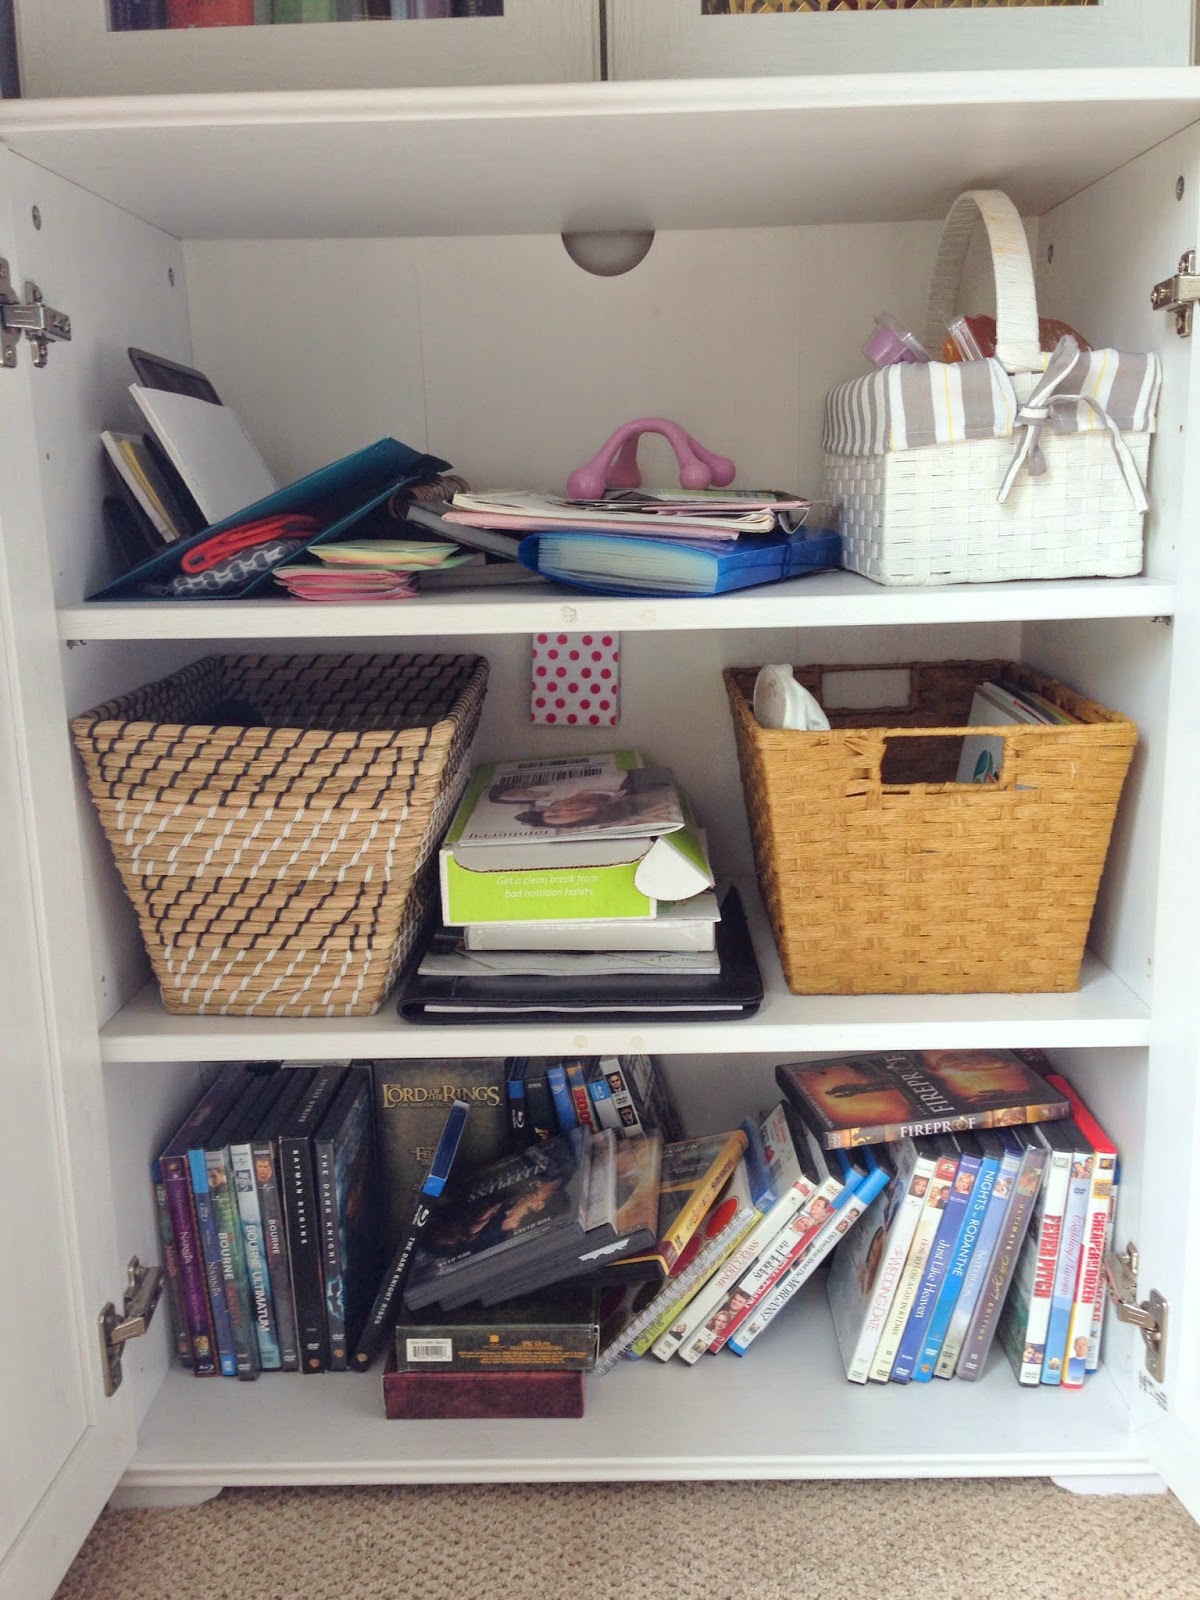
Today we have a simple challenge that should only take about 10 minutes. Are you ready to open up a can of worms cabinet and get rid of some junk?!
I have this one cabinet in my living room that is hiding a secret... it's a complete and utter mess inside! I bet you have one or two of those as well, right? It's called the "let's just throw stuff in here because no one will see." Or "my kids always take everything out of this cabinet and I'm too tired to reorganize it for the millionth time." Well, now is that time.
What I really love is this notebook that's magically floating in the back. I love my kids. :)
This literally took me 3 minutes to take things out, throw away things I never use and relocate some items if they didn't belong.
I gained almost a full shelf!
Because I allotted 10 minutes and this only took 3, I was able to go tackle another junk cabinet!
If you want a sneak peak inside the top, here you go. :)
My living room is still a blank slate. Besides the couch and my DIY Whitewash Fireplace. However, I think my vision is almost complete in my head.
I have learned from my past mistakes to fully get a vision in my mind before I make any purchases or go crazy with DIY projects. I used to buy little knick knacks at a thrift store, picture frames that I wasn't sure where they would go but man they were on a good sale, or random décor pieces that when I got home really had nowhere to go.
I never thought about a room as a whole. Instead it was this section or this wall or what could go on this shelf. But then the room would never seem complete or even put together. You really need to think about the space and how it will all function and look once finished. Plan out all the details so you're not buying some expensive piece of furniture only to realize it won't work with your color scheme in the end.
It does take patience to work this way because this process takes time. Probably months but maybe even a year or two. We have lived in our house for 3 1/2 months now and I think my vision for my living room is complete so now it will probably take a few more months to get some DIY projects done and buy the things I need.
Side note: No other room in the house is complete so this will be the first room to get done! Patience and time my friends.
Let's get back to the good stuff. I have this mirror that is a copper-brown color. It worked very well in our last house but definitely looks out of place in our new home with my color scheme. Of course spray paint immediately popped into my mind!
I purchased this mirror at Lowe's and I believe they still have it in stock.
I cleaned the mirror off with a rag because it had been sitting in the basement for a few months it needed cleaning. I also had a helper. :)
Then she was tapped off! I used a construction like paper from my kid's art easel to cover the mirror portion (although newspaper would work too). Frog Tape helped to keep the paper in place and also covered up any holes. I recommend using very small pieces of tape on any circle project.
I took the mirror to my spray painting cardboard box outside and gave it a coat of primer. There's not many projects I use primer on but this mirror had a shiny finish and I wanted to make sure the final outcome was perfect.
This is the primer I used and this lovely spray paint is quickly becoming my favorite. It is gorgeous! I now want to spray paint everything in this silver metallic color. I need something else to spray ASAP!
Here she is... the final product. I am very happy with how it turned out.
The whole reason for my little rant up above is because this mirror is going to go in the living room. I found this picture a few months ago and immediately fell in love. The wooden shelves are gorgeous and the layout is simply divine.
The clock is beautiful but I already have one in the room so I thought my mirror would be a great replacement. Keep an eye out on the blog because these shelves are already in progress! Bring on the second trimester DIY projects. :)
It's almost time for the weekend! Do you have anything planned? My husband and I are going to start tackle one of our biggest projects to date in our new home and I am super excited. Or maybe we'll take the weekend off and just play with the kiddos. Who knows?!
I thought I'd dedicate today's post to FOOD. Being pregnant requires you to eat about every 2 hours or you start to feel sick really fast. It's hard coming up with something to eat that often throughout the whole day, day after day. So I thought I'd share some goodies with you all to keep me motivated. :)
My husband got me a very nice Ninja blender for Mother's day!! I have been wanting a quality blender for the past 10 years. My old blender didn't even blend ice so I never really made smoothie or juice. I wanted to share one of my favorite green smoothie sites, Simple Green Smoothies. They are awesome and I'm sure I'll talk about them again soon. I am actually drinking this smoothie right now, Beginner's Luck Smoothie.
It's getting warmer outside and that makes me crave cold foods. Smoothies, salads (well sometimes), fresh fruit and this awesome looking dip!
Dashing Dish is a wonderful blog by Katie Ferrell (who actually lives in my home state, Michigan!). She is the sweetest thing and has a passion for food, Jesus, and health. She has a cookbook that is just wonderful and also a devotional book that includes meal plans and recipes. I made this 3 Ingredient Strawberry Slushie the other day and it was so good!
I've mentioned 100 Days of Real Food before because I absolutely love what they stand for and her food is just delicious. I have been craving a BLT sandwich for a few weeks now (why didn't I thaw out some bacon this morning?!). These BLT Chicken Lettuce Cups are a healthier version that look just scrumptious! And now I must eat one ASAP!
Well I think I've shared enough "healthy" recipes, right? Now it's time for my favorite type of food, dessert! I stumbled across these Chocolate Peanut Butter Buckeye Brownies the other day and now I think I'll have to make them right now this weekend!
Which recipe will you try this weekend?